20,000 Leagues Under the Sea

20,000 Leagues Under the Sea is one of my favorite movies. I watched it repeatedly as a child. My favorite thing in the movie was the iconic Nautilus. The Nautilus was designed by Harper Goff for Disney’s 1954 film. I love the mixture of organic and mechanical design. Even as a child, I thought the submarine was pure beauty.

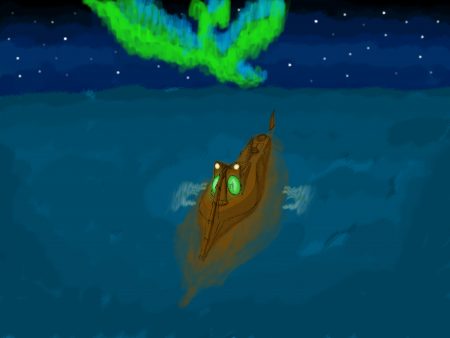
I’ve attempted many times to capture it’s likeness in drawing. I’m not much of an artist, but I think you can tell what the subject matter is.

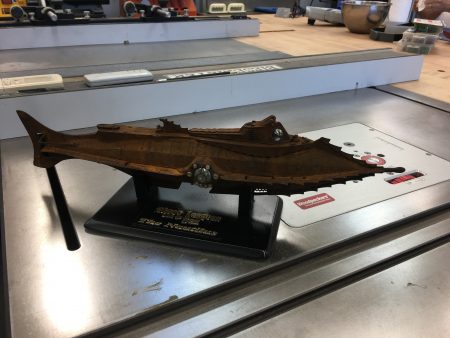
I finally decided to purchase a model. I found a highly detailed model from Masterpiece Models for $100. It’s a 16 inch model based off the reproduction fabricated by Scott Brodeen. In the Nautilus community, his is a well-known name. He researched and created master models that are the most accurate reproductions available, going as far as to place all of the thousands of rivets as accurately as possible.

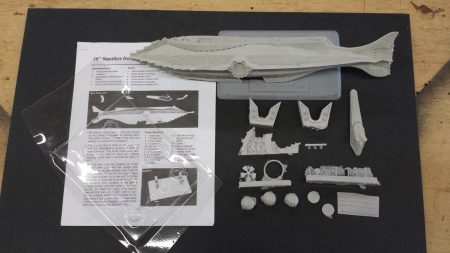
The kit was pretty good. I had a few issues with it as I went. As is common with models, there was a lot of flashing that had to be removed. This is a solid resin casting, and not hollow, so there is some heft to it. A few of the mold lines didn’t seems to be lined up correctly which made some of the smaller pieces less uniform that I would have liked. Specifically, the upper part of the nose, and the support struts for the rear rotor cover.

On the main body, there were some defects. The front of the nose was actually missing. It looks like when they filled the mold with resin (from the tail) the resin never reached all the way to the nose, or there was a large amount of air trapped there. I got some plastic and turned it down to an acceptable approximation and glued it on to the front. Some of the rivets also had bubble problems.

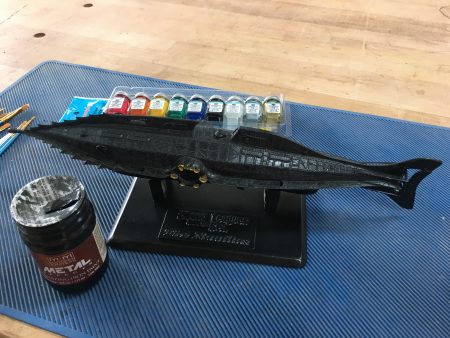
After doing the clean-up and most of the assembly, I did a light primer coat of black.

The interior of the wheelhouse I did a clean steel color. I deviated from what the instructions suggested for colors, and did my own based on memories of watching the movie. The wheel and wheel column are gold.

The lights I painted a mixture of yellow and gold paint.

The remainder was painted using a Modern Master’s Reactive Iron Paint that contains ferrous particles that oxidize using an activator containing acid. Following the instructions, I brushed on two coats of the paint. It comes out as a flat, almost gun-metal grey. A tad darker perhaps.

The magic happens when you apply the activator. I re-purposed a small spray pump that had contained eye-glass cleaning solution. I sprayed it on fairly generously, and then let it sit for 5 minutes. I then applied heat from a hair dryer. You can see the how quickly this take effect form the time lapse footage.

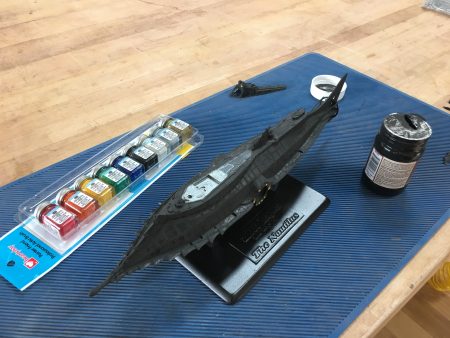
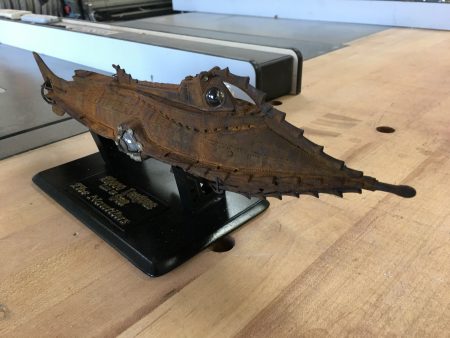
Once everything was painted, I had to apply the bubble domes to the lights and windows. The domes (4) were created using vaccuform, and unfortunately were a bit too large for the openings on the resin model. I ended up using a heat gun to soften the domes in order to place them. Once placed, I tacked them in with super glue.

The lights also needed clear bubble coverings. The kit came with 2 different sizes of googly-eyes. The eyes needed to have the backing removed. I kept dropping them, and they are incredibly hard to see. They too were pretty close in size, but there were a few that didn’t fit as well as I would have liked. I use super glue to place these. Of the entire model, I am most disappointed with how well I executed these, however they are a small enough detail that I think it looks okay from a normal viewing distance.

I assembled the remaining components; Hull, wheel-house covering, upper nose, and observation window structures.

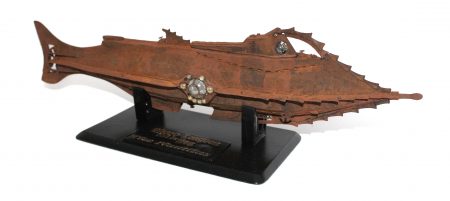
I now have my own recreation of the Nautilus that I can enjoy.

Lego CAD

My first introduction to Lego CAD was an old program I used as a child on Mac OS 7 called Gryphon Bricks. While interesting, it didn’t captivate me very much. I was old enough that I was more interested in the Technic type of Lego set, and there were limitations to the program that I found off-putting.

Since then, I haven’t delved into the world of Lego CAD until this month. I bumped into Bricksmith while searching for something, and decided to download it. Brick Smith is an unofficial Lego CAD program. I read about it  years ago, but never gave it a chance. I downloaded the newest version and was blown away. It uses an extensive library of Lego pieces (from ldraw.org) which include pretty much every Lego piece I’ve ever seen as well as the various prints for these pieces dating all the way back to the 70’s.

As an exercise, I built a T-16 Skyhopper. It went together pretty easily. Bricksmith has some convenient features, as well as some limitations. Everything is grid aligned, and you can move and orient pieces along these divisions. There doesn’t appear to be any concept of mating and piece intersection (which could be seen as a good thing or a bad thing). There is certainly lots of freedom. Once you pick a part, you place it, and you can move it using the arrow keys and rotate it, and select a color. You can copy and paste pieces too.

I’m not enamored with the coloring process. In this case, the problem is that there are so many colors to choose from, that finding them can be tedious.

What I found really neat was the concept of grouping. The pieces can be grouped into steps. Once you complete your model, you can then print the steps out. Step reordering and modification seemed pretty straightforward too.

As a whole, this program is pretty amazing.

While playing with Bricksmith, I spent some time googling to find out more about it, and ran into Lego Digital Designer (LDD), the official Lego CAD system. I somehow had never heard of it even though it was introduced in 2004, so I decided to give it a whirl as well. I played around doing some free builds, and then built a MicroFighter X-Wing.

The experience was very different from Brick Smith. At first, I was annoyed that all the color variation of pieces are displayed as separate pieces int he parts bin, but it actually made getting the correct pieces faster and easier. The other thing I love is that pieces automatically mate to each other. By dragging the piece around with the mouse, the piece automatically snaps to surfaces that are appropriate for mating. This can be faster. Unfortunately, I haven’t found a way of moving a piece directly with the arrows as one can do in Bricksmith. Generally, the auto snapping works well, and if you can’t get it to snap right where you want, usually rotating the camera can do the trick.

The program also knows when two pieces can hinge. The hinge tool is very impressive! After getting comfortable with that, I decided to do a bigger build to put LDD through it’s paces.

The Millennium Falcon. This is one of the larger Lego sets, at over 5,000 pieces. It is no longer sold, and as such, I never had the opportunity to build it in real life. This seemed like a fun way to dive in and see how the program handled. I had the PDF instructions and LDD on screen side by side.

I began constructing this set investing bits of time here and there. Along the way, I fought with some apparent limitations of the program (or it’s user).

However, I did finally complete the model within about a week’s time.

The automatic mating of pieces is a huge time saver when it works. Unfortunately, when there is an intersection problem, the selected pieces are transparent indicating that they can’t be placed. I wish it would highlight the intersection problems in red as it can be difficult to discern where problem areas are. When there are alignment issues, the program is very strict. There are no integrated physics, so hinged pieces don’t fall into place, but stay wherever they are placed. All of the exterior sheets of the Falcon had to be hand adjusted in place to make it fit together.

In some cases, the strict alignment prevented me from following the instruction precisely. In the example above, the hinge pieces are not allowed to bend beyond 90 degrees. In real life, you can forcibly bend them a bit further allowing this configuration shown in the instructions on the left. On the right, you can see that the holes are just barely misaligned, preventing the axle from being inserted.

In other case, I was probably too hasty in finding the proper alignment for elements, and improvised modifications to the model. In the above image, you will note that the angled wing shapes had to be shortened because they were interfering with the adjoining side. This could probably have been resolved by manipulating all the joint angles.

Overall, the tool seems very powerful, and fun. LDD is easy enough to use, that my seven year old can build things on his own, for example, this small Millennium Falcon. The hinging tool and part placement is intuitive enough that he only needed to observe me using the tools a few times to get it, and then be able to do it on his own.

One thing to note though is that some of the part categorization in LDD seems illogical (or at least, not how I would do it). There is a category that appears to be the catch-all for hard-to-classify pieces, and I find myself sifting through there quite often for specific things. Also, one category with an icon of a small wing is in fact home to flat angled, round, and curved pieces, and not just wing shapes which I find bewildering. They were kind enough to include a search feature that lets you filter by part number, size or description. I have had multiple instances where searching by part number provided by the instruction yields no result, yet I could find the part by visual searching through each category.

It’s also been fun using these programs to be able to build sets that are no longer available. While LDD has an easy-to-use UI, and fancy mating and hinge logic, Bricksmith has a superior part catalogue and flexibility for piece placement.

Chocolate Candy Cups

As a young person, I was quite enamored with Reese’s peanut butter cups. Those were one of my favorite candies to eat during the holidays. It’s now been over 5 years since I have tasted them. This isn’t due to amazing will power and good dieting, it’s due to the fact that those candies are lethal to my son. Yet, I still long for those treats.

I decided to make my own that would be safe for my family. I figured I’d be able to find a candy mold for just such a project, but was unable to find any. I was able to make an approximation of a Reese’s peanut butter cup by using cup cake holders, but I still felt that having the correct type of mold would yield better results.

I devised a plan for how I would do it, and then modeled the geometry in Autocad Inventor. The idea is to model the geometry I want (a positive) and use a CNC machine to carve this geometry. From the positive CNC generated shape, I will create a negative mold using a food-grade silicone rubber. Then, finally, I can make the chocolate treats using the silicone mold.

Modeling

Modeling the shape was pretty easy. I figured out the basic dimensions I wanted and modeled accordingly. The final shape should be about 2 inches in diameter and .5 inches tall. Even though I have no intention of wrapping these in paper, I did some careful math to make sure the ridges were appropriately shaped to allow a circular piece of wrapping to be applied. This was done by making sure the perimeter of the ridged top was equal to the circumference of a circle whose radius is equal to the bottom’s radius plus the length of the side.

The goal is to have a void in the chocolate where anything can be put inside.

CNCing

With the model looking okay, I CNCed the geometry out of some scrap hardwood left over from another project.

After CNCing, I removed the positive geometry, and sanded and filled the wood as best I could.

I then put 4 of the positive carvings in a void made out of particle board. Once glued, the whole thing was coated with black enamel to fill the gaps and hopefully make the silicone not stick.

Casting

I ordered a small supply of silicone casting (Smooth-Sil 945) from Smooth-On. This particular product is food-safe, and is activated using a 50:50 mixture of A and B parts, so it’s really easy to use.

Using some simple geometry, I figured out exactly how much material I would need. I poured the correct amounts into disposable bowls and mixed thoroughly, then poured the material into my mold. 6 hours later, I was able to pull the mold out. It turned out very well!

Chocolate

The next step was to take chocolate, and lightly melt it. I used Guittard chocolate, which is nut-safe. I tried different types, but liked the more milky flavors the best (Milk Chocolate 30% Cacoa). Not being a chocolateer, I have a bit to learn. From what I understand, the key to successfully making chocolate treats is to temper the chocolate by melting it at about 115 degrees, then letting it cool slowly at a temperature of 75 degrees. I could be wrong, but it did seem to work.

I was left with things that look like Reese’s, but have an opening and a void on the bottom!

Soy Butter

The delicious insides is a combination of Wowbutter brand soy butter, butter, brown sugar, and powdered sugar. The butter and soy butter are heated, then sugars are added, and then cooled.

It ends up as a dough that isn’t as sticky as the soy butter began. This allows it to be put into the chocolate shells rather easily.

Finishing it up

Now upside-down, additional chocolate is poured to cover the opening and seal in the delicious center.

Conclusion

The result was very tasty, and completely satisfactory. It’s time intensive. The chocolate takes a LONG time to harden. 4-6 hours at room temperature. This can be sped up by placing the chocolate int he refrigerator or the freezer, but cooling the chocolate too quickly can have negative results.

The Reese’s company (Mars) clearly doesn’t make their cups in this manner. Since the paper liner appears to be the actual mold for the chocolate, I suspect they do it in the opposite fashion. They pour the chocolate into the cup with a removable core that leaves a void when removed. The insides get inserted via extrusion, and then the cup gets topped off with chocolate and packaged once solidified. Empty cups that popup online from time to time seem to confirm this theory.

No matter what, I am happy with the result, and my son can now know of the exquisiteness that is a Reese’s cup.

© 2007-2015 Michael Caldwell