MediaWiki on CentOS 7

I’ve set up a few installations of MediaWiki in the past on different operating systems. It’s not the type of thing I do a lot, but when I do, It’s usually not too much trouble.

I was migrating an old MediaWiki installation from a Windows 2007 server to CentOS 7. I figured it would be pretty routine. It turns out there were a couple little hiccups along the way that I figure I should document to help me out in the future.

The first problem I ran into is that CentOS 7 doesn’t ship with a new enough version of of PHP for the current release of Media Wiki.

Uninstall built in version of PHP

yum erase php
yum erase php-common

Install yum repo for newer PHP release

rpm -Uvh https://dl.fedoraproject.org/pub/epel/epel-release-latest-7.noarch.rpm
rpm -Uvh https://mirror.webtatic.com/yum/el7/webtatic-release.rpm

Install PHP packages

yum install php55w* --skip-broken

This allowed MediaWiki to run finally, and I was able to create a new LocalSettings.php. From there I restored the SQL database without any issue. Don’t forget to install MariaDB.

yum install mariadb-server mariadb

To import the old SQL data to the new DB, first creat a DB with the same name, and then pupolate it with the sql file.

# Get into mysql shell
mysql --password=********
# Create DB with same name as old DB
mysql> CREATE DATABASE my_wiki;
# Exit shell

# Import old SQL data to new DB
mysql --password=******** my_wiki < /wiki.sql

I also copied over the images directory from the old installation.

The next issue I had is permissions. SELinux wasn’t even on my mind, and provided all sort of permission problems. I ran the following commands on my html directory where MediaWiki is installed in an attempt to fix everything.

sudo chown apache:apache -R /var/www/html/

find . -type f -exec chmod 0644 {} \;
find . -type d -exec chmod 0755 {} \;

sudo chcon -t httpd_sys_content_t /var/www/html -R
sudo chcon -t httpd_sys_rw_content_t /var/www/html/images/ -R

At this point, MediaWiki is running, but I couldn’t see any images, or upload any files. I tweak settings in LocalSettings.php but to no avail. I enabled logs and better error messages by adding these lines to LocalSettings.php

$wgShowExceptionDetails = true;
$wgDebugLogFile = "/var/log/mediawiki/debug-{$wgDBname}.log";

When I upload a file using MediaWiki, I get the error:

Could not create directory "mwstore://local-backend/local-public/1/1e".

The log file shows the following error:

[FileOperation] mkdir(): Permission denied
[FileOperation] FSFileBackend::doPrepareInternal: cannot create directory /1/1e

I am unable to upload images, so I Google the error message and check my settings. Almost all of the sites talking about this error suggested permission issues with the images folder. I checked my permissions over, and over again with no luck. The rest fo the sites talked about having the $wgTmpDirectory set correctly, which I’m pretty sure I did.

$wgEnableUploads = true;
$wgUseImageMagick = true;
$wgImageMagickConvertCommand = "/usr/bin/convert";
$wgTmpDirectory = '/var/www/html/images/temp';

What bothers me is that the error message in the log looks like it is trying to mkdir at the root level, however MediaWiki switches a lot between url paths (relative) and absolute. It wasn’t clear. The next debugging step was using strace to see what the OS was doing. I attached strace to one of the apache processes and uploaded a file, and lo:

mkdir("/temp", 0777)                    = -1 EACCES (Permission denied)

It is trying to use my root directory as the images fodler location, even though I have a different tmp directory specified in my settings file.

It turns out that there are default setting in the img_auth.php file that don’t appear to be correct. They get automatically set based on the environment. I chose to explicitely set them in the LocalSettings.php document instead.

# Redefining Upload Directory and Path from img_auth.php
$wgUploadDirectory = '/var/www/html/images';
$wgUploadPath = '/images';

Finally. My images instantly start working and I can upload files again. Thank goodness! This wasn’t a difficult thing, but it is surprising that I couldn’t find any help on the internet for this specific problem. And since I don’t install/perform maintenance on MediaWikis very often, there is a lot of stuff I have to relearn. So here it is, some notes on this issue for my future self, in case I ever need it.
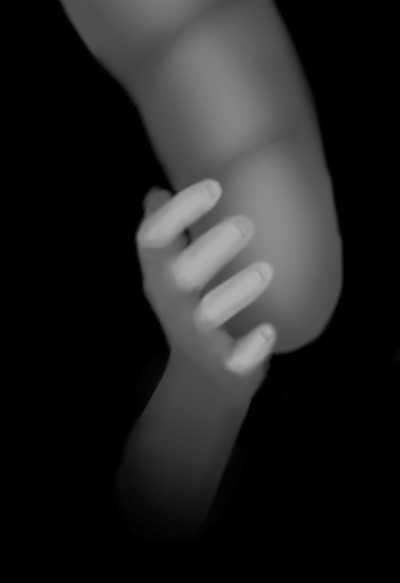
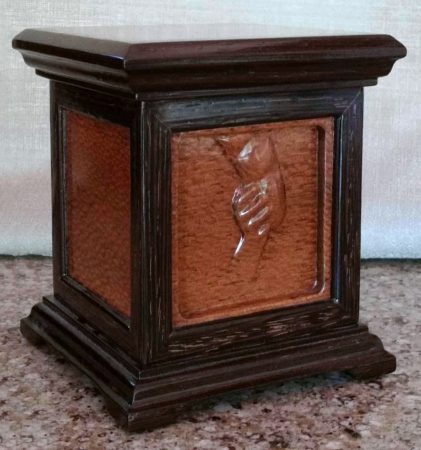
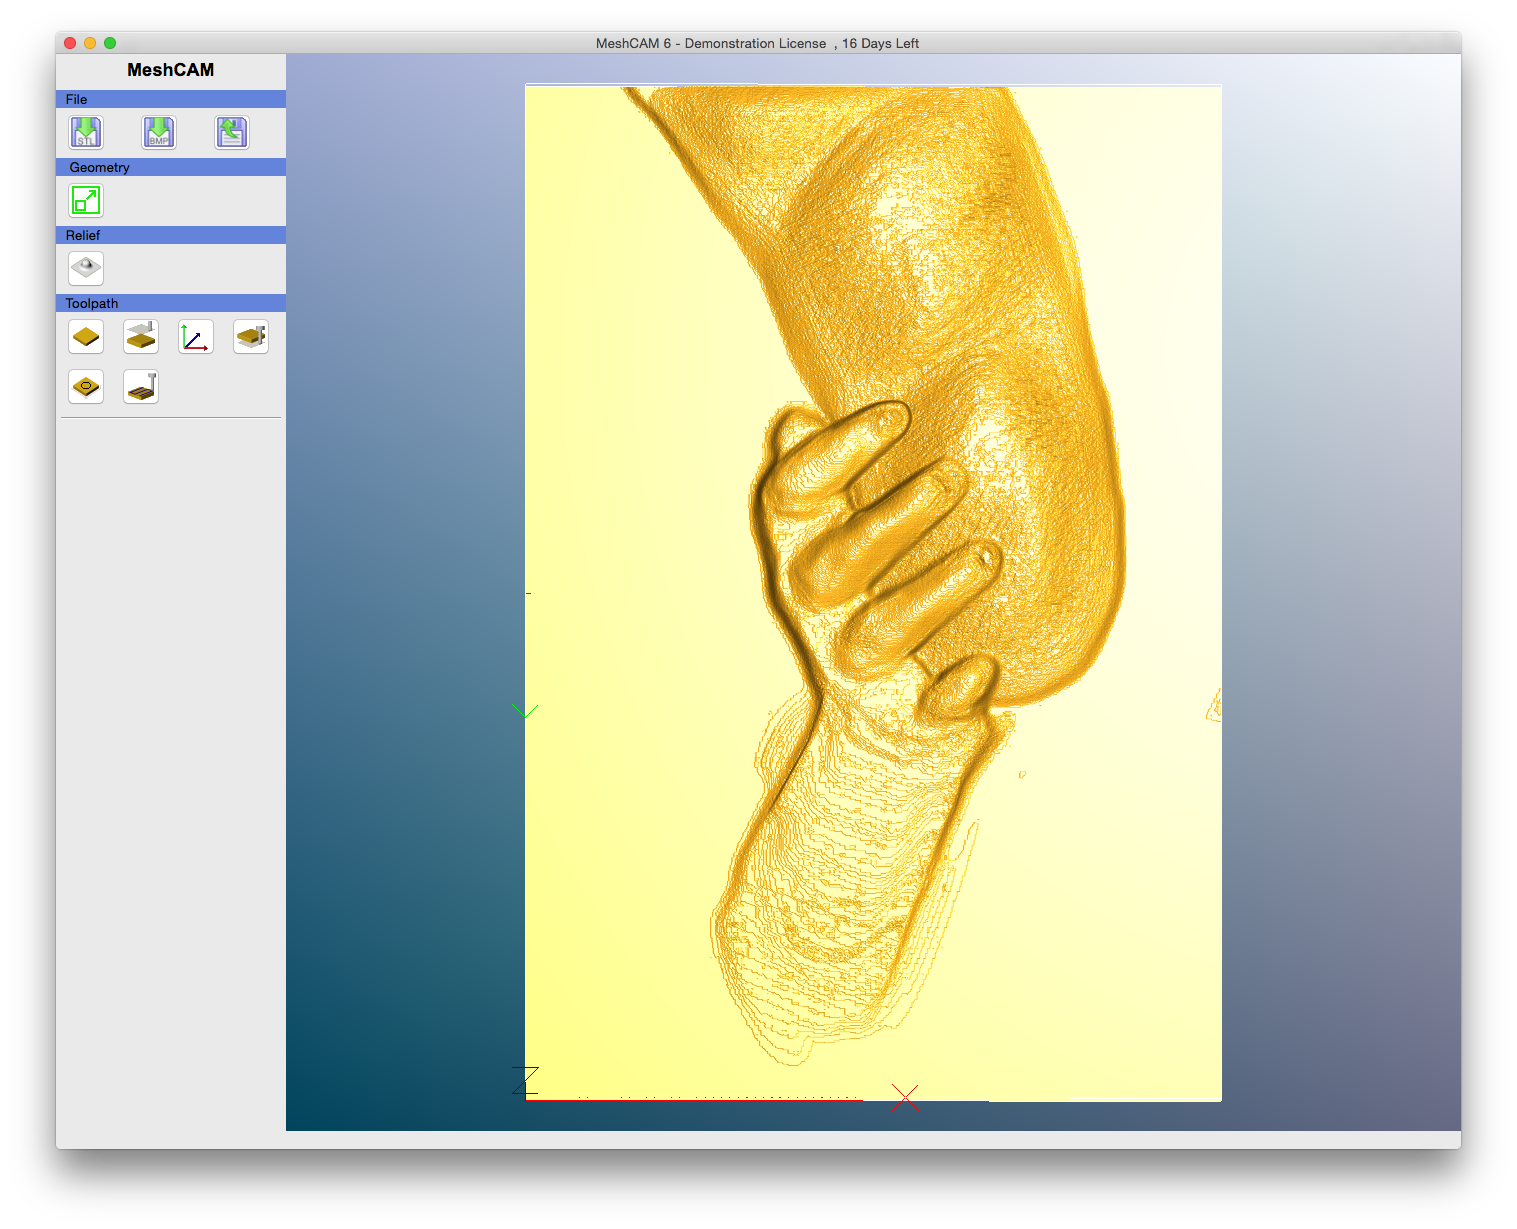
Bed Frame

It recently became apparent that my son was too big for his toddler bed. As we searched for a twin bed at popular stores for children, I found that beds are grossly over priced. The bed my wife liked was over $600, not including the mattress!

We decided that I could make a better quality bed for much less than that, so I did!

Planning

I started out by drawing some hand sketches with rough measurements. I went through the process a few times, each time refining the plan so that it was more complete, and had more accurate dimensions. I also tried to simplify the material selection so there was as little variety in the lumber required as possible.

Bed Plans 2Bed Plans 1

We chose to paint the bed, rather than stain it. This allowed me to choose multiple types of woods which helped cut costs. Here is what was purchased:

Item Usage Quantity Item Price Total Price
4×4, 16ft (Redwood) Bed Posts 2 $13.97  $27.94
1×6, 24 ft Lower Bed Rails 3 $5.91  $17.73
1×4, 8 ft (Spruce) Head/foot board upper rail 1 $1.84  $1.84
1×1, 16ft (Poplar) Mattress Flange 2 $3.50 $7.00
4×8 3/4″ Plywood Mattress support 1 $38.27 $38.27
4×8 1/8″ Plywood Head/foot board material 1 $7.50 $7.50
1″ Slats (molding) Head/foot board decoration 40 Feet $.36 $14.45
Zinsser Primer/Sealer Prime 1 Gallon $19.98 $19.98
Blue Semi Gloss Paint Paint 1 Gallon $26.97 $26.97
Total Cost: $161.68

Total cost after tax: $175.90

Bed Posts

BedPostsThe bedposts are made from 4x4s meant for framing, which come in 8 foot lengths. The posts for the headboard are 4 feet tall, and the posts for the foot board are about 3 feet tall, so there was plenty of wood to get the posts from the 2 lengths that were purchased.

Obviously, the 4×4’s are way too fat for posts on a child’s bed, so I cut them down to 2.7 x 2.7 using a band saw. Next, I sanded them down to 2.5 x 2.5 by taking off .05 inches on each side using a reciprocating drum sander.

The whole bed was designed to be put together using mortise and tenon joints. The next thing I had to do is put in the mortises. For this, I used a mortise and tenon jig that my dad had. I used the largest setting for all of the mortise and tenons I had to do, which made set up pretty easy since I only had to do it once.

With the mortises all cut, I then needed to add a slot for the 1/8″ sheet of wood that will serve as the head and foot boards. I set up the router with the 1/8″ bit, and a depth of .25 inches, and centered it on the mortises, and made made a groove between the upper and lower mortises on all four posts.

Next, I took the hard edge off the corners by running them each through the router, using a small 1/8 inch quarter round bit.

I designed the bed posts to have a decorative groove near the top. The posts will protrude above the upper rail 2.5 inches, so that the protrusion is a perfect, symmetrical cube of material. I used the golden ratio to decide where to put the groove. The groove was made with the table saw, and is just a single kirf width.

Rails

BedRailsThe lower rails for the bed frame are made from the 1×6 planks of wood, and the upper rails for the head and foot boards are made from the 1×4 planks of wood.

The rails will be supported primarily by the mortise and tenons. I set the tenon jig to cut to a depth of 1 inch, so for the final measurement of the wood, one needs to add 2 inches to account for the tenon.

With the rails all cut to length, and complete with tenons, I routed the corners with the same 1/8″ quarter round that was used on the bed posts.

The shorter of the rails which will be used on the head and foot board require a groove for the head and foot board material. I used the same 1/8″ bit that was used on the posts, and added the groove on one side of all 4 rails at a depth of .25 inches.

Finally, some light sanding, and they are ready for paint.

Head and Foot Boards

The head and foot boards are made up of a 1/8 inch sheet of wood that is inset into the bedposts and rails. This will then be covered with decorative slats.

All I had to do was measure the opening, and add 1/2 an inch to account for the groves in which the wood will be set.

Once cut down to the proper sizes, the head board and foot boards can be assembled. This is done by placing one post down on the table with the mortises face up. The upper and lower rails receive some glue on the tenons which are then inserted to the mortises of the posts, and lightly hammered into place.

IMG_3719Glue is applied to the exposed grooves. The headboard material is then slid down from the top until it is seated in the groove on the post. Finally, glue is applied to the other end of the rail’s tenons, as well as the end of the headboard sheet, and the other post is tapped into place. The whole thing is clamped for a few hours until the completed headboard is dry.

IMG_3720I followed this same procedure for the foot board.

IMG_3722Lastly, slats are added. I took the 1 x 1/4 material and cut it down to the proper length to match the height of the inset area on the headboard. I also used extra material to make spacing jigs to help me distribute the slats evenly across the head and foot boards. They were glued in place. In addition to adding visual interest, the slats add a significant amount of stiffness to the otherwise flimsy 1/4″ material.

Painting

IMG_4014The whole bed was dry-fit together and painted all at once. I masked off a strip on the inner side of the long rails where I planned to put in the flanges that will support the mattress board.

IMG_4016I applied one coat of primer using a gravity fed spraying apparatus for the air compressor. This ended up taking forever due to the small amount of paint that the nozzle delivered. It took about an hour, but was reasonably evenly covered.

IMG_4021I let the primer dry completely, and then began applying coats of the blue paint using an airless sprayer. The airless sprayer delivered a much thicker coat, and after 3-4 coats of paint, I had used the whole gallon! It looked pretty good though.

Final Touches

Next, I cut the 1×1″ poplar to length, then glued and screwed it to the interior side of the long rails that had been masked off. This will serve as the flange upon which the mattress board will sit, and carry all the weight.

The very last detail before assembly is to drill the holes in the rails that will hold the headboard and foot board together. I used an angled countersink jig to put 2 shallow-angled holes on either end of both rails that will allow screws to hold it tightly to the posts.

With all the pieces reader to go, the bed frame could be assembled. The rails were lightly hammered into the head board posts, then screwed in place.

The foot board posts are then hammered into place on the rails and screwed in.

The mattress board was then cut to snugly fit between the rails, and then laid on top of the flange with the mattress placed on top.

Just add a pillow and some sheets, and the bed is completely finished!

Results

IMG_0238_e

The bed turned out great. It is super-sturdy. No rocking or creaking. The price was also exceptional. The paint has a few minor blemishes due to my inexperience with painting, but looks pretty good overall.

My son loves his new bed, and it’s sturdy enough for all the antics of a toddler.

2014 Crypto Challenge

In 2014, the Khan Academy had a cryptography challenge, called the 2014 Cryptochallenge. It consisted of a narrative leading to clues that were progressively more difficult to decode. The idea was to introduce people unfamiliar with ciphers and cryptography to some basic ciphering methods through examples and clues. I stumbled upon it well after it was debuted, but still had fun going through the challenge.

Please note that while I am displaying the code I wrote to decode the messages, and describe the methodology to arrive at the answers, I will not reveal the decoded messages because I don’t want to ruin the fun for others.

It all starts with the final clue, actually. In the challenge, the goal is to decipher this message that is found:

clue_4b

After finding out about a pair of burglars in the vicinity, you find a ciphered communique. The goal is to decode the message by finding clues left behind the pair of villains who communicate using various ciphers. Although this main message is the one we want to decode, we have to work through their previous communications in order to figure out the method of encoding.

Clue 1

clue_1

The first clue is a simple cipher. Khan Academy gives us the clue that it is a Caeser Cipher, which is where the value of each letter is shifted n places. For example, we could encode the word “CAT” by shifting all the letters 3 values, and end up with “FDW”. Although easy to decode if you know the method, to someone who has no idea, it will just look like gibberish.

This is simple to brute force, as there are only 25 ways the shift the alphabet. I wrote the following C code to decipher the message in all 25 ways, and then I looked through the results for reasonable output.

void cipher(const char *input, char *output, int shift) {
    for (int i=0 ; i<=strlen(input) ; i++)
    if ('A' <= input[i] && input[i] <= 'Z') //Capitals
        output[i]=(input[i]-'A'+shift)%26+'A';
    else if ('a' <= input[i] && input[i] <= 'z') //Lowers
        output[i]=(input[i]-'a'+shift)%26+'a';
    else
    output[i]=input[i];
}

int main(int argc, char *argv[]) {
    const char *messageA="vwduwljudeehghyhubwklqjlfrxogilqgsohdvhuhwxuqdqbeoxhsulqwviruydxowdqgdodupghvljqedvhgrqzklfkedqnbrxghflghrqldpvhwwlqjxsvdihkrxvhfr";

    const char *messageB="gluhflishjrvbadvyyplkaohavbyjpwolypzavvdlhrvuuleatlzzhnlzdpajoavcpnlulyljpwolyrlfdvykpzaolopkkluzftivsvmklhaoputfmhcvypalovsilpuluk";

    for (int i=1 ; i<=26; i++) {
        char outputA[strlen(messageA)];
        cipher(messageA, outputA, i);
        printf("1/2, Offset: %d\n%s\n\n", i, outputA);

        char outputB[strlen(messageB)];
        cipher(messageB, outputB, i);
        printf("2/2, Offset: %d\n%s\n\n", i, outputB);
    }

    return 0;
}

Clue 2

clue_2

For this message, they give us the clue of Polyalphabetic Cipher. For this type of cipher, there is a key word that is repeated. Each letter of the alphabet is assigned a value based on it’s order (A=0, B=1… Z=25). The value of the key letter is added to the value of the message letter. If the value is greater than 25, you wrap the value around back to 0 and continue. From Wikipedia, we see this example:

Plaintext:  ATTACKATDAWN
Key:        LEMONLEMONLE
Ciphertext: LXFOPVEFRNHR

A (the 0th letter of the alphabet) plus L (the 11th), when added together would produce 11, which is L.
T (19th) plus E (4th) equals 23, which corresponds to X. Etc.

To reverse the cipher, all you need to do is subtract the values of the keyword from the scrambled text.

The key we will use was alluded to in the decoded first clue. For this clue, the cipher key was doubled; that is each letter of the word was used twice before advancing to the next letter. This is apparently a common practice. What tipped me off is that the thieves previous communication began with START, and ended with END. I presumed that they might do the same with this message. By subtracting the supposed value START from the scrambled message, I could confirm that the keyword was in fact doubled, and then plugged it into the program I wrote to decode the whole message.

void cipher(const char *key, const char *input, char *output) {
    int n = 0; // Key index

    for (int i=0 ; i<strlen(input) ; i++) {
        int char_enc = input[i] - 'A'; // Get encoded char value
        int char_key = key[n++ % strlen(key)] - 'A'; // get key char value
        int char_dec = (26 + char_enc - char_key) % 26; // Reverse vigenere cipher
        output[i] = char_dec + 'A'; // Store deciphered message
    }
}

int main(int argc, char *argv[]) {
    const char *code="SSKKUULLLL"; // Doubled letters for key is common
    const char *message="KLKBNQLCYTFYSRYUCOCPHGBDIZZFCMJWKUCHZYESWFOGMMETWWOSSDCHRZYLDSBWNYDEDNZWNEFYDTHTDDBOJICEMLUCDYGICCZHOADRZCYLWADSXPILPIECSKOMOLTEJTKMQQYMEHPMMJXYOLWPEEWJCKZNPCCPSVSXAUYODHALMRIOCWPELWBCNIYFXMWJCEMCYRAZDQLSOMDBFLJWNBIJXPDDSYOEHXPCESWTOXWBLEECSAXCNUETZYWFN";

    char output[strlen(message)];
    cipher(code, message, output);
    printf("%s\n", output);
    return 0;
}

Clue 3

clue_3

Clue three was a tough one. I had to look up the hint, which points to a Kahn Academy video called “visual telegraph.” Within the video, we learn of a character encoding method called “Polybius Square.” It explains how characters can be communicated using pairs of numbers that describe a row and column in a character lookup table. Interestingly, in this clue, the message is composed entirely of numbers! We can assume that the table of characters is five by five in size because we never see any numbers smaller than one or larger than five. Additionally, we can also assume that the message starts with the word START again. This can help us figure out the orientation of the lookup table. I made a program to take pairs of numbers and print out the message using the table, and it worked like a charm!

void cipher(const char *input, char *output) {
    char key[5][5]={{'A','F','K','P','U'},
                    {'B','G','L','Q','V'},
                    {'C','H','M','R','W'},
                    {'D','I','N','S','X'},
                    {'E','J','O','T','Y'}};

    for (int i=0 ; i<strlen(input)-2 ; i=i+2) {
        //Get coordinates from key grid
        printf("%c",key[input[i]-'1'][input[i+1]-'1']);

        //Save ascii to output
        output[i]=key[input[i]-'1'][input[i+1]-'1'];
    }
}

int main() {
    const char *message="44541134541123335344541242434244325141212311311353155442544244424344325141534354324234411125513553341342432253431144543453432251343142143251341253341215541534513351444411225144425442444415345123551543213451111311212351425431533321424351445315341434512542531544335154325341443043513544";

    char output[strlen(message)];
    cipher(message, output);
    printf("%s\n", output);
    return 0;
}

The Final Clue

The final clue stumped me for a while. I ended up getting busy and forgetting about the cryptochallenge. A few months later I found the files on my computer and resumed where I had left off.

Thanks to the previous messages, we found a “safe house” that yielded clues to how this final cipher was put together. Some key insights:

  • The message is converted to digits using a method similar to clue 3
  • There is a binary key which is obtained from a newspaper clipping where consonants are 0 and vowels are 1
  • The symbols represent 2 digits; 1 digit for the vertical/horizontal and 1 digit for the diagonal positions
clue_4c
Clue indicating glyph’s numerical values
clue_4d
Clue indicating glyph’s numerical precedence
clue_4f
Clue indicating visual telegraph layout, and process for ciphering
clue_newspaper
Clue used for cipher pad

There were a lot of unknowns, and a few rounds of guess-and-check. One of the key distractions was thinking that each symbol was a letter. That is not the case! From the clues above, we can basically figure out that the process goes like this:

  1. Each letter first gets transformed into a 2 digit number using a Polybius Square (like clue 3).
  2. From there, the 2 digit number (values maxing out at 66) gets transformed to a 6 bit binary number.
  3. The binary number then gets logically XOR’d with the binary numbers produced by the newspaper article. (This is called the pad)
  4. The final binary gets split up into 3 bit chunks which get encoded into the final glyphs we found.

To successfully decode the message, we need to reverse the process. Looking at the clues, I made a guess as to what value the glyph positions indicated. After running the program, I didn’t get meaningful output, so I reversed them, and voila, it worked.

This time, I wrote the program in Python since Python is so much more forgiving with types.

The program first takes the pad text (the newspaper article) and converts it into binary.

I converted the glyphs to digits by hand, which was the most time consuming part. I separated the first digit and second digit into two different arrays. Vertical/horizontal lines are called ‘messageA’ and diagonal lines are called ‘messageB’.

I then convert these values sequentially into binary to create a “messagebin” array. Each value in the array gets XOR’d against the corresponding position’s value in the newspaper binary pad array. The result is processed 3 bits at a time and converted into an array of digits.

The list of digits is processed in pairs, and letters are looked up from a table. There was a clue showing that the table of letters was a clockwise spiral starting from the lower left. By adding digits to the spiral at the end, it worked out to fit perfectly in a 6 by 6 arrangement.

After some finagling, the program successfully deciphered the message! I was then able to thwart the would-be criminals!

def bin(x):
    return ''.join(x & (1 << i) and '1' or '0' for i in range(1,-1,-1))

# Convert pad to binary
vowels = ["a","e","i","o","u","y"]
padbin = []
pad = "The whole-grain goodness of blue chip dividend stocks has its limits. Utility stocks, consumer staples, pipelines, telecoms, and real estate investment trusts have all lost ground over the past month, even while the broader market has been flat. With the bond market signalling an expectation of rising interest rates, the five-year rally for steady blue-chip dividend payers has stalled. Should you be scared if you own a lot of these stocks, either directly or through mutual funds or exchange-traded-funds? David Baskin, president of Baskin Financial Services, has a two-pronged answer: Keep your top-quality dividend stocks, but be prepared to follow his firm's example in trimming holdings in stocks such as TransCanada Corp., Keyera Corp., and Pembina Pipeline Corp. Lets have Mr Baskin run us through his thinking on divedend"

for c in pad:
    if ord(c) < ord('A') or ord(c) > ord('z'): continue
    if c.lower() in vowels :
        padbin.append(1)
    else:
        padbin.append(0)

# Message based on pictograms
#  2 0 3
#   \|/
# 3 - - 1    where straight lines are first digit (A)
#   /|\      and slanted lines are second digit (B)
#  1 2 0

messageA = [2,3,2,2,0,3,3,0,0,2,2,0,3,2,1,3,0,3,0,3,0,0,2,0,3,2,
            2,1,0,2,1,1,2,0,1,0,2,2,2,2,2,3,2,1,2,1,3,2,
            3,3,0,2,2,1,1,1,0,3,2,1,2,0,0,1,3,0,3,2,3,0,1,
            0,1,3,3,2,0,0,0,3,1,1,3,0,1,2,3,1,0,0,3,2,3,1,
            0,0,0,0,3,0,2,2,3,1,0,1,2,0,0,1,3,0,1,1,2,0,2,0,
            2,1,0,3,3,3,2,3,2,0,1,3,3,0,3,1,3,1,0,0,0,0,
            2,2,0,3,2,0,2,2,3,2,0,0,3,2,2,1,3,0]

messageB = [0,3,2,1,0,3,0,1,2,0,2,2,2,0,1,3,3,0,3,2,3,0,2,1,3,3,
            3,0,3,2,3,3,0,1,1,3,2,0,0,0,2,3,0,3,3,3,3,2,
            0,3,1,0,1,0,2,1,0,2,3,3,2,2,0,0,1,2,3,0,1,3,2,
            1,1,3,2,3,2,1,0,2,0,0,0,1,0,3,1,0,2,0,0,3,1,0,
            3,3,1,2,3,2,3,1,0,2,3,2,2,0,3,3,1,0,0,1,1,3,3,2,
            0,3,2,2,0,1,3,3,0,2,2,3,0,0,0,2,0,3,3,1,3,3,
            3,2,2,0,0,3,2,3,2,3,2,2,1,0,3,3,0,2]

# Convert pictogram elements to binary
messagebin = ""
for i in range(len(messageA)):
    messagebin += bin(messageA[i])
    messagebin += bin(messageB[i])

# XOR pad and message together in binary
charcoords = []
tmp = ""
i = 0
while i < len(padbin) and i < len(messagebin):
    tmp += str(padbin[i]^int(messagebin[i]))
    # Set length of binary digits here (Probably 3 digit?)
    if len(tmp) == 3:
        charcoords.append(int(tmp, 2))
        tmp = ""
    i += 1

# Convert message from binary to alphabet based on Polybius square
key = [["F","G","H","I","J","K"],
       ["E","X","Y","Z","0","L"],
       ["D","W","7","8","1","M"],
       ["C","V","6","9","2","N"],
       ["B","U","5","4","3","O"],
       ["A","T","S","R","Q","P"]]

for i in range(0, len(charcoords)-1, 2):
    if charcoords[i] > 5 or charcoords[i+1] > 5:
        print "?",
    else:
        print key[charcoords[i]][charcoords[i+1]],

This was a very enjoyable exercise, and taught me some basics about ciphers (and patience). I hope they put on similar exercises in the future!

© 2007-2015 Michael Caldwell